Recipe: Homemade Mozzarella
So yesterday my mom & I made mozzarella from scratch. A while back my mom had picked up a "DIY Cheese Kit"to make mozzarella & ricotta from Williams-Sonoma, we've been dying to do it, but haven't had the chance until yesterday. Being home for October break is the perfect time to do all this fun stuff & get some mother/daughter bonding time in, which I love. Making the mozz was super fun & it's so yummy! While the kit is great you could easily get the ingredients at the grocery store that the kit provides.
Supplies
2 small bowls
Large pot (at least 5 quarts)
Large slotted spoon
Cooking thermometer (included in kit)
Large microwavable bowl
Rubber gloves
1 large mixing spoon
Ingredients
1 1/2 cups cool water
1/4 rennet tablet (included in kit)
1 1/2 tsp. citric acid (included in kit)
1 gallon whole milk
1 1/2 tsp. cheese salt (included in kit)
Instructions
Step 1- Pour 1/2 cup of the water into a small bowl & dissolve the 1/4 rennet tablet in the water. (Wrap the remaining pieces of the tablet & store in freezer.)
Step 2- Pour the remaining 1 cup water into another bowl & stir in the citric acid.
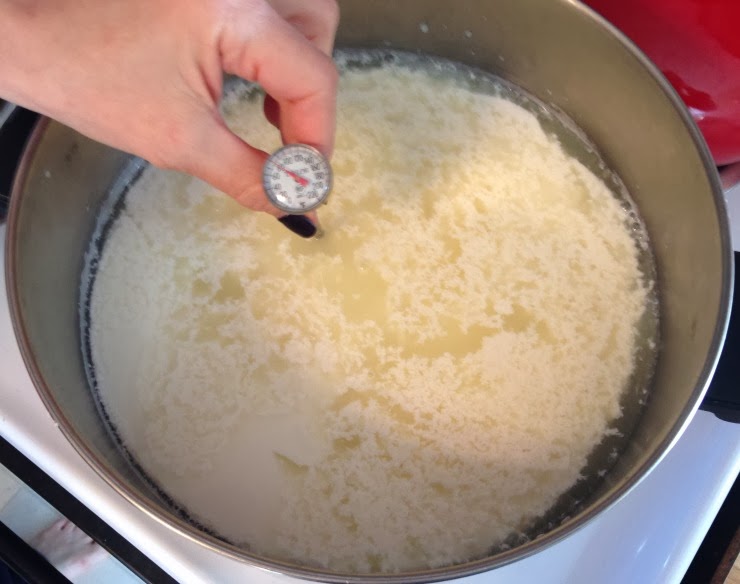
Step 3- Pour the milk into the large pot, add the citric acid solution & stir well. Set the pot over low to medium heat & heat, stirring occasionally with the slotted spoon to prevent scorching, until the milk reaches 90 degreesF.
Step 4- Slowly stir in the rennet solution using a gentle up & down motion for about 30 seconds. Continue heating to 105 degreesF.
Step 5- The curds could already show clear signs of coagulation:
-They will look like shiny yogurt, you will see a separation between curds (white & "solid") & whey (yellowish liquid), & the curds will pull away from the sides of the pot. If so, stir very gently, with slotted spoon, for 1 minute, then turn off the heat & proceed to Step 6.
-If the curds don't look like shiny yogurt, but instead look like clumps of melted cheese floating in yellow liquid proceed to Step 6 (this is what happened to us!).
-If you don't see signs of coagulation yet & the whey is still milky instead of yellow, heat a little longer (110 degreesF max) while gently moving the curds around with the slotted spoon (don't stir just move). You are now cooking the curds & expelling more whey. If the temperature reaches 110 degreesF & you still don't see signs of coagulation, remove the the pot from the heat & let stand for 15-45 minutes. When you see signs of coagulation, proceed Step 6.
Note: If the milk did not form curds at all, you may have been using unlabeled ultra-pasteurized milk. Use a different brand of milk & try again.
Step 6- Ladle the curds into the large microwavable bowl.
Extra Whey:
Step 7- Put on rubber gloves & gently hold back the curds while you pour off the whey in the bowl (do not press much). We left the whey in the pot & poured the whey from the bowl back into the pot.
Step 8- Heat the curds in the microwave on medium power for 1 minute.
Step 9- Use the mixing spoon to fold the curds over several times and evenly distribute the heat. Again drain off the whey like in Step 7.
Step 10- Microwave for 30 seconds more, then drain again. Gently fold the curds over once or twice to distribute the heat evenly. Check the temperature by covering at least 2 inches of the thermometer's probe with curds; they must reach 135 degreesF to stretch properly. If the curds have not reached this temperature, microwave for 30 seconds more (this is what happened to us!).
Step 11- Add the cheese salt & blend them into the cheese by stretching & folding gently, just until incorporated. For the best texture, heat, fold, & stretch the curds as little as possible.
Step 12- Shape the cheese into a ball. Makes about 1 pound. Store in fridge, do not store the cheese in water or whey or it will become slimy & disintegrate.
While you don't have to buy the kit I think it's worth the money, it includes everything you need except the milk & water, it even comes with a thermometer! I thought that making the cheese was relatively easy, but was such a cool experience. My mom & I decided that it was definitely a two person job, so it could be fun to do with a friend, boyfriend, sibling, or parent. We had a blast doing it & it was so cool to have fresh mozzarella at the end!
Have you ever made cheese before?

Learn more about me
here!


f
Oh I love this! I have always wanted to try and make mozzarella! I make homemade pizza a lot and would love to have homemade mozzarella to top it with! I just might have to give it a go :)
ReplyDeleteTotally want to try this sometime... I've heard that making goat cheese is relatively easy, too! Thanks for confirming that it's worth it (and fun!), and will keep you posted how my go of it turns out! ;) XO
ReplyDeleteI've always wanted to try to make cheese! You have just inspired me to do so!
ReplyDeleteMakeover With Aspen